Showing posts with label wraps. Show all posts

Friday, December 7, 2012

Friday's Film: Formal Ponytail Wrap

I originally saw a similar idea to this on Pinterest and I absolutely loved it!  
Ours is just a bit different but you can see how this way may be a bit simpler.  The link to this original pin can be found here.
The French Braid is not necessary but I do really like the look that it gives.  You could even pull this off with a twist instead of a braid if you like!
This picture shows you how we sectioned the hair.
Here's a view of the other side and the wrap.
My princess loved this hairstyle so much that I'm sure it's going to be a new regular for us!

Friday, November 30, 2012

Friday's Film: Wrapped Band

This is a very simple style that you can do any morning and not have a huge time commitment.  You will need a stretchy headband and a Topsy Tail if you have one but it's not required.  
Pretty simple huh!
 Here's what the back looks like.
 Here's a shot of the side that wasn't shown in the video.
You can choose any sort of fancy stretch band to use.
I love hairstyles that are fast and easy!
*AWESOME PRODUCT ALERT*
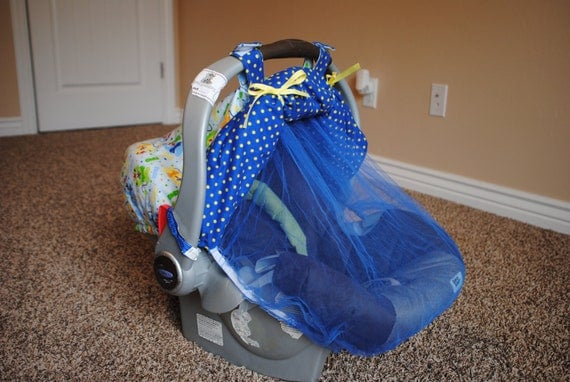
Car Seat Cover with Bug Net
So I don't promote really anything on  this blog but you have to check out these car seat canopy's with the bug covers.  They are FANTASTIC and I have loved mine!  My cute sister-in-law makes them and you can see her shop on Esty here so go check it out!


Friday, October 19, 2012

Friday's Film: Double Fancy French Wraps

After our post on Wednesday we had a lot of feedback and everyone said the same thing, "We need a video!"  :)  (You can find that original post here.) We decided to create a bit of a new hairstyle out of the same thing so we created two wraps to switch it up a little but the concept is the exact same. 
I tried to avoid the spotlight because it causes so many shadows but it still seems dark.  I'm working to fix this problem in the future!  Hopefully you can still get the general idea.
Here is what the finished Double Fancy French Wrap looks like.
Here's a view of the "French" part where the hair has been added in.
This is what the top of the style looks like.
Here's a closer view of the wraps and they look nice but I have to say that I prefer the look of the wraps when the style is done in single form as opposed to double.  A thicker ponytail looks a bit better.  This is still nice though.  :)  

Wednesday, October 17, 2012

Fancy French Wrap

This style looks amazing and the best part is that it's SO SIMPLE!  Start with wet hair for the best results.
Begin by sectioning out the top half of the hair from ear to ear and pulling it into a ponytail.  (You should literally have half of the hair in this ponytail.)  Make sure your ponytail is nice and smooth.
Now section out two small areas on each side of the ponytail - underneath that secured top half.  Cross the two sides over the top of your ponytail and then around and underneath it.  Continue wrapping those strands around the ponytail until you get down to the bottom where you will secure it with one small elastic.  Now Grab two more small areas on each side of the ponytail, just below your previous ones and repeat the wrapping steps. 
 Be careful in your placement of the wraps.  You want your new warps to lie directly above your previous wraps to get the desired look at the end.  Once you have wrapped those two new strands all the way down to the bottom of the ponytail,  Secure it in place with another small elastic.  (Or you can just reuse your previous elastic.)  
 Now grab your remaining loose hair on each side of the ponytail and create one final layer of wraps going down the ponytail.  Secure that at the bottom with one final elastic.  We added a small ribbon on our first elastic but you can decorate the hair with any accessories you like.  :) 

Thursday, May 24, 2012

Friday's Film: Python Piggies

(This is a day early but we are headed out of town for Memorial Weekend and I wanted to get this up for you!)
Here's a fun hairstyle that is not too hard but does take a good 15 minutes to complete.  Start with wet hair and make sure you have a Topsy Tail or similar tool handy. 
You can make your top section that you keep out as big or as small as you like depending on what you want your wraps to look like. 
Here is the finished product.
This angle shows you what the top looks like as you begin to wrap the hair around.
This one also shows the way we created our parts.
Very easy and really cute!

Wednesday, April 18, 2012

Wrap It Up!

Some of the prettiest styles are created by simply giving everyday styles little additions.  This is a basic ponytail at the core but we've added a few things here and there.
Start by sectioning out a thin area of hair along the bang line from ear to ear.  Using wet hair will yield the best result for you.  Now pull the rest of the hair back into a tight ponytail.
Now divide that front section into 3 areas.  We've done ours with a little larger area in the front and smaller areas on the sides but you can separate it however you like just as long as you have 3. 
 Twist each of the sections and pull them back to the elastic that is holding your ponytail and wrap each one around the elastic only once.  Make sure that two of your twists go to one side and the other goes to the opposite side. 
 Also be sure to have one twist go above the elastic and one below as you wrap on the side with the two twists.  The side with only one twist will actually wrap around 1 1/2 times so that it ends on the same side of the elastic as the other two.  (It does not matter if you wrap this one above or below the elastic.)
  Now take all three of those twist and braid them into a Regular 3-Strand Braid right outside the elastic and this will secure those wraps in place.  Take that braid and wrap it around the ponytail as many times as you can and then wrap an elastic around the ponytail where the braid ends to secure it in place. 
 Grab a small strand of hair from the back of the remaining ponytail and wrap it around that new elastic to conceal it.  (You should only have to wrap it around a couple times.)  Use your Topsy Tail and poke it through that elastic and pull the ends of that new wrap through and back into the ponytail.  This will secure it tightly.  Now braid the remaining ponytail into which ever braid you like.  We've just done a Regular 3-Strand Braid here.  Secure it at the bottom with an elastic.  Conceal that last elastic the same way as your previous elastic with a strand of hair from the back wrapped around and pulled through with your Topsy Tail.

Friday, December 2, 2011

Friday's Film: KNOTty or Nice

It's going to sound completely crazy but this hairstyle totally came to me in a dream!  :)  How sad is it that I'm dreaming about hairstyles!  We call it the "KNOTty or Nice" because of the knots and also because it's the first Friday in December!
Pretty easy huh!
Here are some pictures of the finished product and I really like how it turned out.
This is the one that we did on the video and it's a Regular KNOTty or Nice style where the knots have not been pulled at all.
This is a Pulled KNOTty or Nice style.
The knots have been pulled really tightly and the excess hair drapes at the sides. 
Here is a side view of that.
This hairstyle is very versatile and this is what it looks like if you pull at the knots a bit and just play with the shape of it.
You'll notice that your hair below your final elastic may seem longer than with a normal braid and that's because your knots use up some of the length from your other strand so you'll have to secure it a bit higher.
Have fun playing around with it and seeing which way you like it best!

Monday, September 26, 2011

Milk Maid Wrap

This is a really basic style but it does require long hair.  (Sorry all you cute bobs out there!)
 
 Start by dividing the hair down the middle using any part you like.  Now pull each side up into a ponytail and secure it with an elastic.  Create a 3-Strand Braid out of each ponytail and secure it at the end with an elastic. 
 Now have some bobby pins ready for this next step.  Take the right braid and wrap it around the elastic holding the left braid and add some bobby pins by the elastic to hold the braid there in place. 
 Repeat the same step with the left braid going over the right elastic. 
 Now gather both of the remaining braids on each side and bring them to the middle and join them with a new elastic. 
You can take out the previous two elastics that were holding the ends of the braids and unplate any braid that falls under the new joining elastic.  You can use some bobby pins to secure this elastic area to the braids above but it is not a necessary step. 
 Place a hair clip over the elastic to hide it and fan out the ends of your braids.

Wednesday, September 14, 2011

"Fan"cy

We were running a bit late for church this last week so we had to come up with a hairstyle that was fast!  We call this one "FAN"cy because it looks like a fan on top.  :)
Start by dividing the hair from one ear to the other and securing the top half into an elastic. 
 Now take a small section from that ponytail and bend it up in a horseshoe shape above the elastic.  Bobby pin it into place over the elastic. 
 Continue doing this with section of hair from the ponytail until all of your ponytail has been "horseshoed" and bobby pinned. 
 
You will end up with the ends from your ponytail hanging down over the remaining hair and a fan effect above the elastic. 
 Grab a hair clip to place over the bobby pins and hide them.  We've used some decorative hair pins here.  (Quite a few of them because my princess wanted them ALL in - you don't need this many to get the job done.)  :) 
 
This only took about 5 minutes to complete and we were ready to head out the door.  

Monday, June 20, 2011

So Inspired!

Here is another hairstyle that my princess fell in love with that we found here at Babes in Hairland.  She calls this the "Figure 8 Braid" and I think that's a great name for it!  This is our version of that same braid.
 
 I just started by creating two side piggies with a straight part down the middle.  Divide each piggie into 3 pieces. 
Hold two of those pieces completely still while you wrap the third piece in and out of the two.  The third piece that you are wrapping will run out before you reach the bottom of your piggie so just secure it in place with an elastic where it ends. 
 These are really fast and have a fun new look to them. 

Powered by Blogger.
back to top