Showing posts with label tips. Show all posts

Thursday, April 12, 2012

How To: Hayley Williams Inspired Make-Up Tutorials

The lead singer of a legend band named - Paramore , Hayley Williams, is a real presenter of the girls alternative rock scene. I heard about Paramore years ago, but I didn't know any of they'r songs... So, one day I turned on the TV and heard the song "Monster". I've got interested and went to You-Tube and found a lot more songs. And today, I'm addicted to them. My favorite songs are:
-"Monster"
-"The Only Exception" 
-"Decode" .... and much more
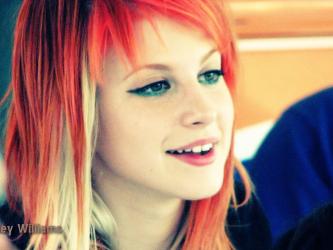
So, in the honor of my favorite rock singer, who's hair is made of real fire ;), I will post a quick make up tutorial, because the only thing you need to do to get her hairstyle is to dye your hair into fire orange. But, if you want I can post a special tutorial for that kind of hairstyle.

Let's get started! This is a make-up tutorial from the "Misery Business" video. It's pretty and it goes with a colorful and happy outfit. Perfect for a sunny day and a walk through the city. Use a gold shadestick. But, be careful, this is not a everyday make up, if you wear it at day, you will look too flamboyant, and that's not very smart. Good luck! I really like it!

And the second make up video is inspired by the song " The Only Exception" and it's much more natural. And simpler. You will need some nude colors.


All of the pictures are from We Heart It and Google


Sunday, April 8, 2012

Style Inspirations #1

Love the brave combo with black and white and pink blazer

Using accessorizes, make your everyday outfit even better

Sequins - always IN 


Backless dresses are so IN this summer/spring


Monday, March 19, 2012

Make Up Tips


Basic:


How to Apply Foundation
  • Mix and warm foundation on the back of your hand.
  • Dab small amounts of foundation on different parts of your face.
  • Start at the center of your face and with a sponge blend outwards spreading the foundation evenly.

How to Apply Powder

  • Pick up some powder with the powder puff and remove excess by tapping off your hands.
  • Gently apply a layer of powder all over your face and blend the color into the jaw and neck area.


The Make Up Part:

How to Apply Eye Shadow
  • Apply a light shade to highlight the brow bone and medium tone to cover the entire eyelid.
  • As an option, a dark tone can be applied the crease of the eyes as an accent to create depth.
How to Apply Eyeliner
Apply and blend eyeliner along lashlines; extend line to the outer edges for a more dramatic look.

How to Apply Mascara
Add a coat or two of mascara; let each coat dry before applying the next coat.


Wednesday, August 24, 2011

Awesome New Tip

I've tried many different ways of organizing our hair supplies and I've posted several of them in my Accessory Organization post. 

Click on the link for some great ideas for your ribbon, small clips, elastics, flowers and other hair supplies.
I've always struggled with organizing headbands.  They are bulky and don't fit in small containers. 
You may remember my post on the Cure for the Headband Headache (instructions are on the link) and this is definitely a great solution but I found that I only had room for two of these containers on the dresser and we had many more headbands that needed a home.  I was browsing my favorite new site, Pinterest, and came across another idea that I had to try:
They are paper towel rolls that I attached to the inside of the bathroom cupboard door.  The original that I saw was attached the wide way but I needed two so I attached mine the long way.
I took an unused roll of paper towel and covered it with some fabric. (Zebra is my princess's favorite)  I stitched the fabric together for the length of the paper towel, placed it over the roll and then just hot glued the two ends in place.  It works perfectly for us and hopefully it will be a helpful idea for you!

Monday, July 18, 2011

Securing A Stretch Band

My princess loves wearing the stretch headbands but I've always hated them because I can never get them to stay in place.  After a few trials and errors we finally found our solution. 
I usually start by creating a small, off-centered part in the bangs and I brush them towards the ears. 
I then pull a bit of hair next to each ear forward before placing the headband on the head. 
 Get your headband in place and then pull the two pieced of hair over the band and secure it with another small piece of hair behind the elastic.  Use a small elastic to join the two pieces on each side. 
 Now lift all the hair up and pull a small section of hair out from underneath the band right at the nape of the neck.  Pull it over the band and secure it with s bit of hair under the band with an elastic.  Once these three elastics are in place, the band will not go anywhere! 
You can leave it like this or finish of the hair however you like. 
We've done a Corkscrew next to each ear that we joined in the back of the head with an elastic. 
I straightened the rest of her hair and then added a flower clip to hide the elastic.  Her hair looked as good at the end of the day as it did at the start!  Hope this tip helps!

Wednesday, February 16, 2011

Cure for the Headband Headache

This is not a new idea and I've seen it on the web several times but it's the first time that I've actually made my own. 
 If your princess is like mine, she has a basket full of headbands that are all tangled and messy.  Here is our solution:
Simply grab a large container of oatmeal cereal at your local store.  There are a few sizes so just make sure you get the one that is "headband-size".  :)  Empty your oatmeal into a gallon Ziploc bag so you can still use it.  Grab your favorite scrapbook papers and cut them to size and wrap your container.  We've also added some decorative ribbon to the top, bottom and middle of ours.  The nice thing is that you can also store your stretchy headbands inside the container - just open the lid.  :)
  Hope this helps some of you out there that may be as frustrated as I was with headbands!  

Friday, January 28, 2011

Flashback Friday: Pink Curlers

It's Flashback Friday time again.  Remember these pink overnight curlers that our moms used to torture us with?!  Well, I used to torture my little princess with them too.  (Until I found Curlformers that is!)  My daughter is 3 in this picture but I started with these curlers when she was about 2. 
I used to get my princess to hold still by letting her color at the table, watch a show or I'd just do her hair while she was eating.  :)  Make sure the hair is wet when you put these curlers in.  We dried and curled her bangs under and then pulled her hair up into her little top-piggies BEFORE putting the curlers in.  
After about 3 hours her hair had finally dried (she has VERY thick hair) and we were able to take out the curlers.  She looked just like Shirley Temple!  These curls were great too because we had church the next day and they had loosened up perfectly by then!

Wednesday, December 8, 2010

Instructions for Snowflake Clips

I've gotten some requests and lots of emails about these snowflake clips so I thought I would post instructions for anyone that is interested.
Supplies Needed
*White 3/8" grosgrain ribbon
-4 that are 5 in. long (a)
-2 that are 3 1/2 in. long (b)
-2 that are 2 1/2 in. long (c)
-1 that is 1 3/4 in. long (d)

*11 clear rhinestones
-1 medium size
-10 small size

*1 lined alligator clip
-I use a double pronged clip (from Sally's) because the ribbon lies better on them and their more versatile when being clipped into the hair or onto bands.
-You can line your clip with any color 3/8" grosgrain ribbon.

*Hot glue gun and glue sticks

*One toothpick
Instructions
1.  Seal all the ends of your ribbon pieces with fabric sealer, a lighter, or a wood burning tool - which is what I always use.  (They can be found under $10 in the craft area at Walmart.)
2.  Grab 2 ribbons that measure 5 in. long (a) and one ribbon that measures 3 1/2 in. long. (b)  Place a dot of glue on one side of (b) at the very end and attach one (a) so that the ends are flush. 
3.  Flip over ribbon (b) and place another dot of glue on the exact same spot and attach the second (a) so that the ends are flush.  You should now have three ribbons (two the same length on the outside and one shorter in the middle) that are all attached at one end.
4.  Place a dot of glue on one side of (b) at the other end.  Make sure you grab the (a) ribbon that is on that same side and attach it so that the ends are flush.
5.  Flip over ribbon (b) and place another dot of glue on the exact same spot and attach the second (a) so that the ends are flush.  Now these three ribbons should be glued together at both ends.  
6.  Place a dot of  glue in the very middle of (b) and find the middle of ribbon (a) from that same side and press it down firmly on the glue to attach it. 
7.  Flip over ribbon (b) and place another dot of glue on the exact same spot in the middle and find the center of the second (a) to press into the glue. 
 
8.  Place two more dots of glue on both sides of that center dot on ribbon (b). (Make sure the new glue spots are centered as well.)  Ribbon (a) should look like it has 2 humps now.  Find the center of those humps and press them into the new glue dots.
9.  Repeat this step on the opposite side of (b).
10.  Your ribbon (b) should now look like it has 4 humps on each side.  Grab your toothpick and spread a tiny strip of glue on the inside center of each hump and pinch it together. 
11.  Repeat steps 2-10 with your remaining (a) and (b) ribbons.
12.  Grab your (d) ribbon and your two (c) ribbons and repeat steps 2-7 with these shorter ribbons. 
13.  Now your ribbon (d) should look like it has 2 humps on each side.   Grab your toothpick and spread a tiny strip of glue on the inside center of each hump and pinch it together.
14.  Find the very center of both of your (a/b) ribbons and attach the centers together with glue.  (Make sure you attach the broad sides of the ribbons.) 
15.  Add another strip of glue inside by the center of your (a/b) ribbons and press the end of your (c/d) ribbon firmly into the glue. 
16.  You should now have the look of 5 arms of the snowflake shooting out.  Let the glue cool completely and attach the snowflake to your lined alligator clip.
17.  Attach your medium size rhinestone directly in the center of the snowflake. 
18.  Attach 5 of your small rhinestones to the very end of each arm of the snowflake.
19.  Attach the remaining 5 small rhinestones to the pinched together part in the center of each arm of the snowflake. 
20.  You're all finished!  These look darling in the hair or attached to a beanie or band.

Monday, August 30, 2010

PARTicularly PARTial to These PARTS

It's a PARTS  PARTy.  :) 
I use different parts in a lot of my hairstyles so I thought I'd kill some time while we were in our hotel and get pictures of my favorites. 
 This is the "Butt Crack"  (Thanks to my sis-in-law for the great name.)  :) 
This is the "Zig Zag".  (My princess thinks they look like "greater" and "less than" signs.)
  You can make your angle at whatever degree you like and they can be as tight or as wide as you like.  
 Here's the "Swirlie". 
Just make the "S" shape down the scalp.  
We call this one "Blocks" because it's kind of like blocks stacked on top of each other.  
 Just  create 90 degree angles down the head - making sure to keep the lines parallel. 
 This last one is the "Heartbeat". 
Notice how it's only on the top half of the head and the bottom is the "Butt Crack" part.  You can mix all different parts together for a different look. 
This is the best comb to use for making parts.  It's a rat-tailed comb that I picked up at Sally's Beauty Supply for a couple bucks but I'm sure you can find it other places as well.  I use this comb for everything and would suggest picking one up if you don't already have one.
Remember that parts can be made anywhere on the head and do not need to always be centered.  They also don't need to cover the whole head.  Be creative and you can come up with all sorts of fun stuff. 

Powered by Blogger.
back to top