Showing posts with label netting. Show all posts

Monday, November 12, 2012

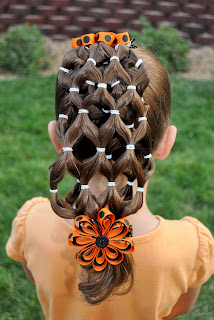
Netted Overlay

Here's a pretty hairstyle and I love it because the netting is so fun and we haven't done netting for a long time.  Have lots of little elastics handy.  It's fun to pick a color that coordinates with the outfit if possible. 
 Start by creating a part from ear to ear that is only about an inch and a half from the bang line.  Now that you have that section of hair you can divide it into 8 equal sections and secure each with an elastic.  Comb all of the remaining hair straight down. Take each of the little ponytails from your sections and divide them in half - except for your section closest to each ear.  
Starting on the right, combine the whole section closest with the ear and the right half of the adjacent section together with a new elastic.  (About an inch farther back on the head.)  Now combine the other half of that adjacent section with the right half from the following section.
 Continue doing this around the head until you come to the far left where you will make sure to include the entire far left section with your final elastic.  Start on the right again and repeat the steps - making sure to add in the whole section closest to the ear.  You will have fewer and fewer sections as you move farther back on the head and your side should slowly start to come together towards the back.  
Once you are down to 4 elastics/sections go ahead and create a flat 4-Strand Braid.  Your netting should lie on top of the remaining hair that was combed straight giving it that "overlay" look.

Wednesday, June 22, 2011

Dance Revue Hair

My princess had her final dance revue a little while ago and she needed to have her hair pulled up tightly.  This is what we came up with. 
 I started by dividing out a 1.5 inch section of hair the whole way around the head.  I pull the rest of the hair inside the part into a tight ponytail.  I then divided my hair that I sectioned out into 7 squares - one in the front middle and 4 more on each side. 
 
I pulled each square into an elastic.  I then divided the hair from each elastic into two equal pieces and combined one piece from each adjacent elastic into it's own elastic about 2 inches from the first one.  Do this the entire way around the head to create a bit of a "net" look.  After I had my second row of elastics I added all the remaining hair into my center ponytail and secured it with a new elastic. 
I then grabbed a bun mold and created the center bun. 
 I separated the excess hair that was left over into two pieces and created Corkscrews out of each.  I wrapped the Corkscrews around the base of the bun and then secured them in place with some bobby pins. 
 I also sprayed her hair with glitter spray for her performance.  
  It was solid as a rock for the whole revue and that's exactly what we wanted!  :)

Thursday, April 21, 2011

A Little Something EGGstra

We first saw this hairstyle last year over at Cute Girl Hairstyles.  I've been dying to try it ever since but I had to wait for Easter to come back around.  :) 
Start off by parting the hair down the middle.  We've used a zig-zag part but any part will work.  Now secure each side with an elastic so that you now have two piggies. 
 Choose your colors of eggs that you will be using before hand and try to have the same colors of elastics.  If you don't have coordinating elastics you can use clear ones.  Also, my princess has pretty long hair so we were able to fit 3 eggs on each side but you can also use two or only one. 
Begin with one side and then just repeat the steps on the second side once the first is finished.  Separate the ponytail into 5 equal sections and tie an elastic around each section - about 1/2 inch below the original elastic. 
This is where I changed it up a bit and added a second layer of elastics for each egg.  Using the netting effect, add five more elastics another 1/2 inch down. 
 Once all 10 colored elastics are in, you can slide your egg into place.  Gather all the hair together under the egg and secure it in with another elastic.  Now you're ready to move onto the next color. 
Simply repeat the steps with the elastics, place your egg and secure it again by gathering all the hair under the egg and tying in an elastic.  Do the same for your third egg if you have one and you are all finished! 
This hairstyle was a real hit at school and she was even able to use it a second day.  We just removed the eggs and she had really cool netted ponytails.
  Also, here are some fun Easter clips that we made and you can use any ideas that you like!

Saturday, March 26, 2011

Netting Updo

Here's a pretty one for church or a special occasion. 
You will want to work with wet hair and create 5 vertical sections - making sure that you have one directly in the middle and two on each side of that.  Secure each section with an elastic back in the middle of the head.  You should now have 5 ponytails. 
 Separate each of the ponytails into two sections (except for the two outside ponytails) and combine one section from one ponytail with one section from the adjacent ponytail. Do this for each of the ponytails.  Your two outside ponytails will be added in with one section from their adjacent ponytails.  Make sure that your elastics combining the section are about 1.5 inches below the first elastics. 
You should now have 4 ponytails.  Tuck all of the netting up underneath itself so that the 4 ponytails are line up with the outside 4 original sections. 
Using a Topsy Tail, pull the 4 ponytails through those 4 sections.  Create a Barrel Roll out of each of the 4 pieces of hair and secure them over the original elastics with bobby pins.
  Add a hair clip over the middle elastic and spray the hair for a nice tight hold. 

Friday, December 10, 2010

Prettying Up a Pony

This is a fast but cute little twist on a regular ponytail.
Start by pulling all of the hair tightly back into a ponytail and then grab some colored elastics to begin your design. 
Grab a small section of the ponytail from the right side and tie a colored elastic around it about an inch down.  Grab a section from the left side of the ponytail and do the same.  Now combine the two sections with another colored elastic about an inch below the first two.  Now grab a new section from the right side and a new section from the left side and put each into it's own colored elastic.  Combine the two about an inch below with another elastic.  Keep going with the pattern until you run out of hair and just secure all the ends together with one final colored elastic. 

Saturday, November 27, 2010

Just Four Fun

Start by sectioning off a group of hair from ear to ear and then divide that into 5 individual sections - having one right in the middle of the head. 
 Now secure each section into a little elastic and create a Pull-Through.
  Create another section running horizontally just parallel to the first.  Now divide that into 4 individual sections.  (Those 4 sections need to be off-centered from the original 5 sections creating a "brick" look.) 
Now divide the Pull-Throughs from the original sections into two halves and combine them into the four sections behind and secure each section with an elastic. 
Pull the front sections right next to the ears back without separating into half. Now make those four sections into Pull-Throughs at well. 
You will be left with 4 ponytails that you will combine into a woven 4-Strand Braid.  This is done by taking the far left strand of the braid and going under and over the adjacent strands until it reaches the other side and then continuing the same pattern with the new left side strand.   
When you get to the bottom you can combine the braid with the rest of the hair and secure it with an elastic.  Add a hair accessory and you're all finished!

Friday, October 22, 2010

Halloween Hairdos: The Haunted House & The Trick-or-Treat Bag

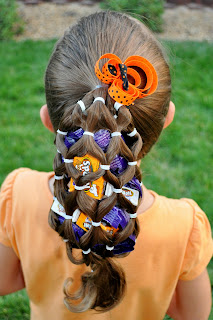
Yesterday I told you that I had some more hairstyles using the netting from the "Spider Web" and here they are. 
Pull all the netting up off the head and down into a ponytail.  Now add a couple of ghost clips to create a Haunted House.  (We made our clips out of ribbon but you can just cut some out of white felt and glue them to bobby pins or clips.)  Looking at it now, I should have added a full moon at the top and some bats...  :) 
Another fun look is the 3D Netting Ponytail.  Simply tie all your ends together at the boom of your ponytail and add a couple fun Halloween clips. 
 You can see that it has that 3-Dimensional look to it. 
 You could also place your spider clips on this for a different type of web. 
This is The Trick-or-Treat Bag and this is just a "for fun" style.  Your netting is already in the shape of a bag, so just fill it with some trick-or-treat candy and tie an elastic at the bottom to hold it in. 
 Add a cute little clip to the top to finish it off - we love Mickey at our house! 
My sons loved this style and chased my princess around the house trying to grab her candy...  they live to torment her.  :) 
 Here are a couple of great updos also using this netting and this one is pretty with the curls on top.  The curls were just created from the twist buns off the "Spider Web" style but you could also curl them with an iron. 
Take the candy out of the "Trick-or-Treat Bag" and also take out your clip.  Now lift the bottom elastic up into the air and push it down into the middle of the netting until it meets the elastic from the original ponytail.
  Attach the two elastics together with a claw clip (which will be hidden under the curls) or bobby pins. 
Let the curls fall loosely on top and your Netting Updo is complete. 
The last Updo is very simple. 
Have your 3D Netting Ponytail hanging down and simply pull the bottom elastic up to the original ponytail elastic (making sure to go underneath all the netting) and tie them together with a festive ribbon. 
Have the bow tied down at the bottom instead of the top.
 Let the curls fall down below the bow and she's set to go.  
Now see all the fun styles you can create out of the one?! 
 Have fun! 

Thursday, October 21, 2010

Halloween Hairdos: Spider Web

Now this one does require some time so make sure you don't plan to do this with only 5 minutes to spare.  :)  Also, you can recycle this style to create LOTS of different looks.  I'll add some more tomorrow. You'll see that it is worth the time that goes into it because you can get a few days of styles out of it.
Here are the little spider clips my princess and I made specifically for this hairstyle.  Aren't they cute?!
Have the hair completely wet and begin with a very TIGHT ponytail in the back of the head.  Make sure you gather all of the hair up into it. 
Now grab whatever color of elastics you want for the netting.  We started ours by breaking the ponytail into 6 small sections and tying each off with an elastic 1/2 inch above the starting elastic.  You'll want to pull each section outward along the head so that they are spreading out.  
*Tip: Use small claw clips to hold the sections you are not working with in place.*
Divide each new section into two equal pieces.  Combine the right piece and the left piece from the adjacent section with an elastic.  Continue doing this around the entire head until all 6 elastics are in for your second row of netting. 
Continue adding rows of netting as far out as you can go.  (It will depend on the length of your princess's hair.)  When you've reached a point where you're netting is finished, simply roll any extra hair into a small twist bun and secure it with a tiny claw clip.  You could also curl the ends if you would like, my princess just had tiny ends left over. 
Now you can grab your spider clips and add them wherever you like on your web. 
Don't forget to check back to see the "Haunted House", "Trick or Treat Bag" and a couple fun updos you can do using this hairstyle.  :)

Powered by Blogger.
back to top