Showing posts with label knots. Show all posts

Monday, October 15, 2012

Long Knot Puffy Braids

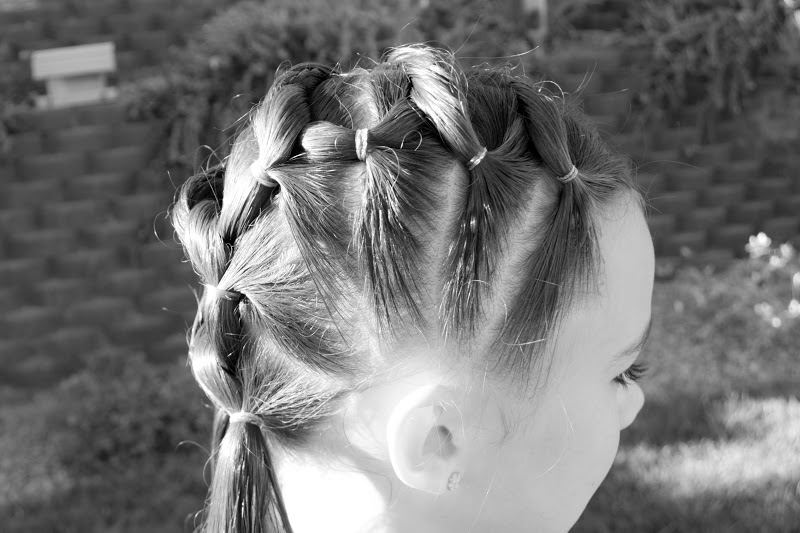
Thanks for being patient with us while we took a couple weeks off.  We have had family in town and lots of school and extracurricular activities going on.  We are excited to get back to posting some hairstyles and our first one is called "Long Knot Puffy Braids". 
 Start with wet hair and divide it in half  by creating a part directly down the middle of the head.  Now make a small section at the front of the head on each side of the part.  Combine each of those sections into a small elastic so that you now have two small ponytails - one on each side of the part.  Take those two ponytails and do the first step of tying your shoelace - take one over the other and pull it through so that the ponytails have created a twist and are now on the opposite sides from which they started.  
Have your princess hold those two strands while you sections out two new areas.  (Right below your previous two.  Add the ponytail on the right side in with that new section on the right and secure it with an elastic.  Do the same on the left side as well. 
Now take your two new ponytails and just repeat the steps.  
Continue creating new sections of hair down to the bottom of the head.  You will finish with two final ponytails.  

Monday, September 17, 2012

Super Chunky Knot Braid

Here is a very fast and simple hairstyle that is great when you're short on time.  It's called the Knot Braid because it's just a series of knots.
This style works best with long hair because it takes up a lot for each knot.  (My princess has hair a couple inches from her waist and you can see how much shorter it is once the braid is done.)
Begin by pulling the hair back into a ponytail.  Divide that ponytail into two equal sections and cross them over each other and pull the top section up and through the back and then pull to tighten.  *Basically you are doing the first step of tying your shoe - a half knot.  Now just repeat the step of creating a half knot over and over again until you run out of hair. 
 Secure your braid at the bottom with an elastic.  It has a very full and chunky look and it pretty cool! 

Friday, September 7, 2012

Friday's Film: French Knot

This is a style that we kind of came up with on the spot this morning and decided that it would be a great video to share because it's an easier way to create a French Braid type of style.  
I apologize for the messiness of some of the video, my princess has extremely long hair and sometimes it looks super tangled.
 The hairstyle itself is really beautiful and it's nice because it's one that you can do on yourself as well.  (Not too many strands to keep track of.)
This shows the top of the braid and what it looks like as it gets started.
The bottom side of the French Knot tucks under while the top side tucks over and inside.  
We did our braid on an angle so that it ended as a side ponytail but the orientation of your French Knot is totally up to you.  
We added a flower clip to conceal our elastic on the side and that finished it off nicely.   

Friday, August 31, 2012

Friday's Film: Knotted Ladder

We have had several requests for a tutorial on this hairstyle:
This picture was sent to me from one of our friends on Facebook and  absolutely love the style.  I wish I knew it's origin so I could give credit where credit is due. You'll notice how complete perfect this picture above looks.  Well, mine was not as great (this was my first attempt) but I'm sure it will get better with practice.  :) 
 Something very important that I wish I had been better with is making sure to hold the strand tightly so they don't loosen up.  You will see that ours loosened a bit and I was kicking myself that I wasn't more careful about that.  
I should have kept my add-in strands smaller like in the example picture and then I would have had more crossing hairs as well.  
I started our hairstyle a bit farther back on the head than in the example but you can do it however you like.
To finish it off I simply wrapped a small strand of hair over the elastic to conceal it and then poked a Topsy Tail through the elastic, threaded that strand through it, and pulled in in tightly so that it was secure.
It's a very beautiful hairstyle and hopefully this tutorial helps those of you that were looking for some instruction!

Friday, June 1, 2012

Friday's Film: Basket Weaving

This was another hairstyle that we got SEVERAL requests for a video on.

 It's our Basket Weaving hairstyle from last week and it's very easy as you will see.
The original post for this style can be found here and it's got the written instructions plus some more pictures.

There are several ways you could end this hairstyle.  Here we have two piggies and in the video we have a 4-Strand Braid.  You can use whatever you like.

Wednesday, May 23, 2012

Basket Weaving

Here's a new one that we came up with today that is basically just a variation on our Swedish Piggies.  It looks difficult doesn't it!  That's the beauty of it, this is one of the most simple hairstyles to create!  We've called it "Basket Weaving" because that's exactly what it looks like but there is no weaving involved - thank goodness! 
You can start with wet hair or dry hair but I do find that the ends sty in place better with wet hair.  Make a small part coming off of your bang line that is about 2-3 inches long. 
It can be right in the center or off to ones side like we've done here.  I like how the bags look "swept" this way.  Now comb the remaining hair straight back. 
Gather a section on each side of your part going down to the ear and secure those sections into little piggies using elastics. 
You now have two new pieces of hair that you are going to work with.  Simply cross them over each other at the back of the head (over the rest of the hair) and tie a half knot.  (The first step when tying your shoelaces.) 
 Have your princess hold the left side while you gather a small section of hair on the right side just below that first elastic.  Secure the right side of your half knot in with that small section by using another elastic.  Do the same over on the left side.  You've now made the top of your "basket". 
You still have two pieces of hair to work with and you are going to cross those over each other to create a half knot once again and just repeat the steps as before.  Continue this process down the head until you have gathered all of the hair in from the sides of the head.  You may still have some hair hanging down and you can divide that in half and add it to each final piggie by securing them with elastics.  The style gives the really cool effect of being woven together when really it's just stacked.
  Told you it was simple!  

Wednesday, April 25, 2012

Pretzel Knot & Piggies

Full Credit for this hairstyle needs to be given to Princess Hairstyles for this post.  It's called the Pretzel Knot and it's what inspired this hairstyle.  I first saw this Pretzel Knot here on Pinterest and then followed it to the Princess Hairstyles site where she has a fabulous tutorial video posted!
 When I first attempted the knot I had a hard time trying to keep my side strands secure so I started mine a bit differently and it helped me a lot.  I started by creating a small 2 inch part at the front of the head just a bit off-centered.  I then created a section on each side going from the part down to the ear. 
 I secured each side with an elastic next to the ear and this helped to hold my piece I was working with a little better and this made all the difference.  I then divided the remaining hair into two equal sides and set them aside for a moment.   
I brought those to pieces to the back of the head and create the Pretzel Knot as instructed by Princess Hairstyles video found here.  At this point I had my knot made but it looked as though it was loosening a bit so I decided to secure it. 
 I took my right end of hair from my knot and added it in with that right half of hair that I had previously sectioned out and secure it all into a piggie using an elastic.  I did the same on the left side as well.  Now my knot was tightly secured and was not loosening at all.
I created a 5-Strand Braid out of each piggie and secured it at the bottom with an elastic.  I finished it off by adding some flower clips and calling it good.  When she got home after a long day at school the hair looked just as great as when she had left!  (That's not always the case with my active daughter.)  :)  

Friday, December 2, 2011

Friday's Film: KNOTty or Nice

It's going to sound completely crazy but this hairstyle totally came to me in a dream!  :)  How sad is it that I'm dreaming about hairstyles!  We call it the "KNOTty or Nice" because of the knots and also because it's the first Friday in December!
Pretty easy huh!
Here are some pictures of the finished product and I really like how it turned out.
This is the one that we did on the video and it's a Regular KNOTty or Nice style where the knots have not been pulled at all.
This is a Pulled KNOTty or Nice style.
The knots have been pulled really tightly and the excess hair drapes at the sides. 
Here is a side view of that.
This hairstyle is very versatile and this is what it looks like if you pull at the knots a bit and just play with the shape of it.
You'll notice that your hair below your final elastic may seem longer than with a normal braid and that's because your knots use up some of the length from your other strand so you'll have to secure it a bit higher.
Have fun playing around with it and seeing which way you like it best!

Friday, November 25, 2011

Friday's Film: Long Knots

We posted a video last week showing you how to do some flat iron curls and this is the other part of that same hairstyle.  These are called Long Knots and they add a fun look to lots of different styles.  (I apologize for some of the instruction being out of the frame but hopefully it won't hinder the basic idea.)
Remember that you can secure your Long Knots with bobby pins if you would like to.
Like I said in the video, you don't need to secure the bangs before hand but we chose to do that for this particular style. 
We only did 3 knots here but you can do as many as you like and they can be as big or as small as you like just depending on how much hair you grab. 
Her ends were just left hanging for this style but you can pull them into braids, buns, or ponytails as well. 
We just finished it off with some flat iron curls and we posted the video for those last Friday. 

Friday, November 18, 2011

Friday's Film: Bella Curls (Flat Iron Curls)

Well, it is a big day today!  It's the release of the new Twilight movie, "Breaking Dawn - Part 1".  This is exciting for us here in this house and all of the kids went to school wearing Twilight gear that my husband and I got on our trip to Forks, WA.  (Yes!  FORKS!!!)  :)  I'm gearing up for a big party tonight with some more of my Twi-hard friends and I thought it would be fun to do a Twilight themed video for you.  These are basically Flat Iron Curls but that doesn't sound as fun as "Bella Curls"!
*Remember that it's always better to spritz the hair first with a heat protecting spray.* 
You can see that the curls are nice and loose and look very natural. 
We have her bangs tied under and some Long Knots on top and I will have a video for those next Friday. 
Her curls lasted throughout the day and looked beautiful. 
I actually did this video on Sunday so you don't get to see her cute Twilight clothes but you'll just have to pretend.  :) 
Have a great day and GO TEAM EDWARD! 

Friday, August 5, 2011

Knotted Crown

My princess came up with the idea for this one and wanted to give it a try.  This hairstyle is easiest with wet hair.  
Start by making a straight part on the top of the head that goes all the way back to the crown.  The part can either be directly in the center of the head or a little off-centered like we've done here. 
 Now section out 3 parallel areas on one side of the part and secure each area into an elastic, giving you 3 parallel ponytails.  Move to the other side of the part and do the same thing.  Now make 3 more vertical sections going around the back that you will also secure into ponytails.  
Start with the back-center ponytail and wrap it around itself then pull it through the middle, creating a knot over the elastic.  
Now move to the adjacent two ponytails and create knots out of them as well.  (I had my princess hold the ends of my knotted ponytails until I secured them so they would not fall out.) 
 Pull the remaining hair from those two knots to the back knot and secure them in with that ponytail - just below the knot - with a tight elastic.  Move up to the next two adjacent ponytails and do the same thing. 
 Finish knotting the rest of the ponytails and adding the remaining hair into the back ponytail as shown here. 
Add some hair clips over the ponytail to hide all of the elastics. 
It turned out pretty cute and she was so proud of her creativity! 

Powered by Blogger.
back to top