Showing posts with label how to. Show all posts

Sunday, September 16, 2012

Beachy Waves, Kristen Stewart Way

Hey everyone, sorry for not posting anything for these few days. I guess I'm feeling a little uninspired.... but I think I'm getting back my inspiration with the amazing beachy waves that are Kristen Stewart's signature look. They look so youthful, fun and intentionally made to look "undone". Kristen is one of my favorite actresses, and I just love her style in general. So when my hair grows back, I'm definitely gonna try it!

This is Kristen for the 2009 MTV Movie Awards. These beautiful messy, sexy waves will never get old, and they're so easy to make! Take a look at this video:


Kristen Stewart chose the 2011 MTV Movie Awards to showcase no fuss no muss hairstyle. And she did it well, combined with the red safety pin custom made Balmain dress. To recreate Kristen's low-key yet sexy spent-the-day-at-the-beach waves, here is the tutorial:

Fekkai Celebrity Stylist Adir Abergel created a raw rock and roll style for Kristen. SoAbergel started by applying the Fekkai Advanced Full Blown Volume Styling Whip throughout and rough dried the hair. Once dried, he re-applied the Fekkai Advanced Full Blown Volume Styling Whip and re-dried the hair to create a natural wave. He then backcombed the hair from roots to ends spraying Fekkai Coiff Sheer Hold Hairspray and slightly ironed the hair. Finally, he brushed the hair to form the texture of the hair.
All products by Fekkai: Advanced Full Blown Volume Styling Whip ($23) and Fekkai Coiff Sheer Hold Hairspray ($24). Available at Fekkai.com and Nordstrom, Neiman Marcus, and Saks Fifth Avenue stores.
As she walked in the red carpet during the recent 2012 MTV Movie Awards, you can’t help but love her in her quirky lime and silver mini-dress, and of course, her signature wild tousles that a lot of girls would kill to achieve. She was all rock glam, and gorgeous! Here's an no-heat tutorial: 

Wash your hair with a shampoo and conditioner (do not comb it but do brush it before washing). Let it air-dry for a while until it becomes a little damp. Work on some volumizing mousse through your hair to give it more body as well as a natural look when it dries up. Part your hair into four sections. Using scrunchies, twist the first section round and round, and as tight as you want them. Loose twists mean loose curls. Clip it up to a bun. Then, do the same thing with the rest of the sections. Leave the buns on for 1–2 hours, and then let them loose. Flip over your head and scrunch your hair with your hands to give it body and definition.

To achieve the side-sweep part, drag one section of your hair to the other side and secure them with bobby pins. For the finishing touch, finger-comb it or use some cream or spray to get rid of the unruly ones. The messier the better, good luck! 

Wednesday, September 12, 2012

Glamorous Up-do

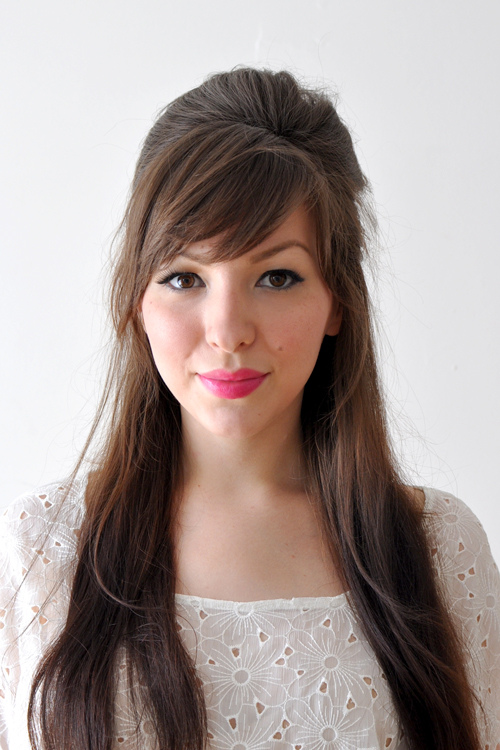
I've always loved these kinds of updos, like beehives. They look so glamorous and vintage, and if it sometimes ends up looking messy, you can't make a mistake, messy updos/beehives look amazing! And the deep slide gave it a chic touch and with that finishend the look. I just wish I had all that hair to experiment with these kinds of hairstyles... well I can only wait. Visit Bobby Glam for the original tutorial. 


 You need to section your hair off to fit the hair booty, leaving enough hair to cover the it. You can backcomb the roots of your hair if you are looking for an extra volume lift for this style. You can get the deep slide by parting your hair so it is in line with the arch of your eyebrow. Once you have sectioned off your side parting, secure in place with bobby pins. 

Next you need to section your hair into two different sections. Using the end of your comb, begin from the top of your ear and work around your head to create a neat parting which separates your hair into two sections. Neatly tie the top section of your hair into a ponytail using your hair band to ensure it stays put. Now it’s time for the styling of the hair left down! It's always nice to add some extra flicks to the ends to get the retro vibe. 

You basically straighten your hair until you get to the ends where you turn your wrist and flick the iron up. Spritz all over with hairspray and neaten up any fly-aways. Easy! 

Thursday, September 6, 2012

Hair Extensions for Beginners

Well yes hair extensions! They can be very helpful when it comes to styling. It's actually very obvious why they're so important. The hair it's self is human, and of the best quality, so it's also very important to find a great quality hair extention clips. Why clips? Well they're the easiest to insert. I recommend HeadKandy extensions because the set comes with a lot of hair. Which is great if you want a real natural look.
I've learned all that in the Hair Extention for Beginners post from the amazing blog named WhishWhishWhish.

The colour is the least of the problem. You can always email the team and they would recommend you the colour that might fit you the best. So no worries about that. Insering them is very simple too, and even if you don't really get it this time, you can always check some videos. After some practice, if your hair colour is not completely matching the hair extensions colour, learn how to blend it all out! 


To put them in, you simply part your hair, clip up a section, backcomb at the roots slightly so the clips have something to grip, and clip away! There is a guide that comes with your extensions that tells you exactly where to put which section of hair, and each section is also numbered in the order you insert them too.

It all just takes a little practice. Do you use hair extensions?

Monday, September 3, 2012

Loose Floral Updo

Effortlessly romantic, this simple twist is easy, versatile, and irresistibly femminine. Wear it loose and tousled for a bohemian effect. Floral headbans like this one, are so beautiful and always welcome on weddings. Katie from Skunkboy blog did this hair tutorilal on Etsy, Bridal Beauty, and I must say that this combination with a loose twist bun goes perfect with the flowers. Try it out!


Gather the hair on the top of your hair (where you want the bump to be) snd tease it. Take the hair and smooth the top and gather the sides. Start twisting the section of the hair into a half bun. continue twisting to make a bun. Pin everything in place and add a touch of flowers, lace, bows or whatever you like! 


Sunday, September 2, 2012

Ponytail Twist

How often do you wear ponytails? They're so cute and there's nothing more trendy when you spice it up a little bit. The hair is very vital part with your everyday look. It can tell exactly how much you take care of it. And when you srtyle it, it can give a completly different look. So if you're looking for some great ways to spice up your hair, try this amazing 5min. tutorial from A Cup Of Jo.


Split your hair into two sections, straight down the back, but off center, about 3/4. You want one large section, and then one smaller section that's about an inch or two away from your ear. Than take the larger section and make a ponytail, securing tightly with a rubber band. Twist the smaller section AWAY from your face. Make the twist as tight as you can, so it doesn't become too loose later on. After that, wrap the twisted section over the top of the ponytail and around to the bottom. Pin the twisted wrap in place. After you've secured the twist with enough pins, let it untwist and blend in with the rest of your ponytail. Done and done! SO easy!


Saturday, August 25, 2012

Quick Twisted Buns

Well since I have my not-so-new short hairstyle for a while now, I'm starrting to miss my long hair... Don't get me wrong, I like my short hair, bu sometimes I miss the freedom of trying all kinds of hairstyles. So, A Beautifull Mess maybe heard me, and made a post about four quick and easy hair tutorials for short hair. They are pretty good, so go and check them out here! This only one of them:


Separate your hair into three ponytails. Then twist the pony into small a bun and secure with bobby pins. Continue like that untill you finish the look! And done! 


Wednesday, August 15, 2012

The Perfect Holiday Hair

Here is a little secret technique for perfect holiday hair. I just love it! It looks cute and perfectly undone, and in the same time just enough. All the credits go to A Beautiful Mess, and amazing Katie. Thank you for shairng! You may think that she used a curler on the third picture, but it's actually a piece of thick fabric. It's been folded one or two times. The fabric she used was 4.5x4.5 inches and dubled over.

Start by gathering a section of hair from the top of your head. Tease it to add some textue and volume. Take the piece of fabric (already folded) and warp the hair around it like a curler. Continue rolling the hair untill you reach the scalp. Pin in place. After that, add some random braids just to add a little character.

You can add some hair accessories, just to fill the look. And done!


Tuesday, August 14, 2012

Little Braided Bun

Yay! Well, everyone here's a brand new hair tutorial made by my dear friend Anastasia from Free & Wild and myself. Yesterday we kicked in and descied to make a very casual n' sweet hairstyle and I think this one really fills up our expectations. Normally, it's very easy, and I hope you'll enjoy it! We are both so excied!


First you'll want to braid a little braid on the side and just keep it there untill you use it. So, divide your hair into two sections. The upper section can be a little smaller than the other one. Now take the upper section and just make a low twist (like you're makeing a little bun) and pin it. Take the low section and braid a regular braid. Make sure that you don't pull it down when braiding, that'll just make a strange bump. Use an elastic to tie it. 

After that, take the braid and twist it around the mini bun. As you can see, we didn't find an elastic that matches her hair color, but you can always fix that by covering it with hair. Make sure that everything is solid so it won't fall off. At the end take the little braid and pin it under the bun. That will give you a beautiful, casual look. You won't need any hairspray, we also didn't use any hair products in this tutorial. Ana's hair is naturally thick and curly. 


Thursday, August 9, 2012

Summer Braided Twist Updo

Remember Sara Lynn Paige? Her Gibson Bun tutorial is amazing! And really easy to make, it'll just look like you put some effort in it. So here's another beautiful & quick braid twist. As you already know, I always tend to post easy hair tutorials, even though it has braids or something like that. To be honest, I'm not that good at braiding them, sometimes I even mess up the regular ones. So don't worry. And for more info, visit Summer Braided Hairstyle l Katniss Reaping Braids.


You'll need to make two braids on each side of your head. Don't worry about a perfect part because you're going to comb over it so it looks like there was no part. Ok, some tips: braid your hair down your side, be careful not to pull it towards the front while braiding or you'lle be left with a strange bump when you pull it back. If you have shoulder length hair, start your braid more towards the back instead of on the side or the front. It might be a little tricky to braid behind your head, but it just takes practice.

One you finished the braiding part, pull back one side and lay it over, pin it, take the ends and tuck it underneath the braid so it won't be seen. Take the other side and pin it over the other. It doesn't really matter which side goes over the other.


Once you're done, you'll want to take a comb and just gently run over your past so it'll look clean. 

Monday, August 6, 2012

The Piece-Y Pony

Need something to spice up your regular pony? Well here it is. The Beauty Dep. gave this is a perfect way to style it quickly & sitll looking amazing. Well, unfortunately, I went to my hair stylist a few weeks ago... Looks like my hair was a little bit more damaged than it thought it'll be. So, I finished with a shoulder lenght hair. Oh my, I'm still not used to it, but it seems that it fits me well. And it's better for a change, sometimes is good to jump out from your comfort zone.

Tools: curling iron, clear ponytail holder or a one that matches your haie color, some bobby pins, comb, hairspray.

Start by adding some curl to your hair from more texture. Tie a low ponytail. They made a line from the ear and used the hair on bottom for this. Then divide the top into 3 even sections. After that tease the middle section fir added volume and textures. Twist the middle secion and pin it into the low pony using bobby pins. Tease the side section for more texture. After that twist it back and pin it to the low pony using bobby pins. Repeat the teasing on the other side and, aswell, pin it to the ponytail. Pull a few pieces out aroud your face to soften the look. At the end, put some medium hold hairspray. 

Friday, August 3, 2012

Braidmaid Hairstyle

Hey everyone! Oh, it's been almost four days since the last post, and I'm sorry fort that. I've been a little lazy pants last few days. But here I am and I have loads of great hair tutorials in my booksmarks to show you. Here's one of them - the braidmaid hairstyle. It's called like that because it looks like a milk maid. These kinds of "braidmaids" became very popular because they can be combined with almost everything and have a little elegance in it. This hair tutorial is from Treasures and Travels. The blog belongs to a few girls that are glad to share their life and dedicate their blog to the little things in life. Just amazing!

Okay, the steps are very easy. First start braiding a classic french braid on the sides of your head. Pin the ends righ underneath the other against the head. Done! 

Wednesday, July 25, 2012

Voluminous Braided Up-do

How to get volume to your hair? That's something that I always ask myself because my hair is stick straight and pretty heavy, so curls can't last long. To get more volume the hair must be airy and you must start making volume from the moment you finished washing your hair. I have a tutorial for that - Blow Dry Basics. So after you've done that, head back here and start this amazing braid crown updo. The source of this tutorial is from  Keiko Lynn, so for more info on how to make this hairstyle go there.


If your hair needs more texture, you can use a dry shampoo. This will  make the teasing past a lot easier.
Spray at your roots, lifting as you go. Wait a minute or two and comb it through of else you'll be left with a powdery mess. Then divide your hair into two sections, like you're doing a half updo. back comb underneath the top half and smooth over the top.

Pin the newly teased section (make sure the top layer is smooth, to cover the mess) with a couple bobby pins. You can give the bump a little boost if you want.

Divide your hair into two sections and braid them. You can tie them using a elastic, or leave them loose.
Pull each braid to the opposite side of you head and pin them in place. You can tuck the ends underneath each braid. And that's it! Have fun!  


Monday, July 23, 2012

Inside Out French Braid & Twist

If you need to go on some important event, and there's a problem. Your hair. How to make it look perfect with enough romantic look and enough sophistication? And plus, if you're having a bad hair day? The answer is very simple - inside out french braid. It'll correct your bad hair day, and the thickness of the hair is not important. My biggest tip is to let it be a little messy. Hairspray is not used here, but if your hair has layers, use some flexible and strong hairspray. Thank you The Beauty Dep. for sharing!

Divide your hair diagonally into 3 sections. Push the 2 side sections in front of your shoulders. Do an inside out french braid. You'll need to go just past the bottom hairline so you'll have the room to tuck the hair under later. Gently and slowly, pull the french braid apart. Keep pulling until it starts to look like "loops". If those with layers have a problem in this part, just use some hairspray and tuck in some loose pieces. Now, tuck in the tail of the braid under and pin it in place (try to use large bobby pins). It should look like this - see photo 5. Next take one of your side pieces and tease them. Then twist and drape it across the back. Pin it and repeat the process on the other side. Add extra bobby pins if you think some parts are loose. 

Friday, July 20, 2012

Lazy Top Bun

It's time to play a little with your hair. Try out new looks and techniques, and start with this simple look. Keiko, a beautiful blogger from Keiko Lyinn did this quick, well let's say little loose bun-ponytail hybrid. Why did I choose this tutorial? Well, it's very basic. Playing with high ponytails and volume is a great way to start. As she said in the video, the hair's best texture is day after you wash it. Fell free to take a tour through my blog, and find all kinds of hair tutorials from all over the web. Happy Friday friends! 


Thursday, July 19, 2012

Messy Twist Updo

A quick twist and done. Ivania from Love Aesthetics really made it look so simple. Her unconventional style shines through this hairstyle. And the big earrings, are a great contrast to this low casual hair twist. As she said, she likes when hair looks a little bin neglected. Try it out, maybe it'll become your everyday hair routine.


Wednesday, July 18, 2012

Low Side French Braid

Hey guys! I hope you like the new things that I've added to the blog. First the new navigation bar, looks nice right? And then there's an image slideshow. There's a problem with it, so please don't try to click on the pictures. They are not linked, so go and look for the post in the archive, or use Blogger search. Until I fix that, tell me what you think about it?

This hairstyle is so easy to make for those who know how to make a simple french braid. It can also be an low updo. And it's really romantic and casual. The best thing is that you can make it with medium length hair. Thank you Maegan from ...love Maegan. This tutorial is amazing!
Preparation: The most important thing about this hairstyle is texture. After you wash your hair, let it air dry, so it'll be all fluffy. Also curl a little side of your hair, for the effect. Don't forget to follow the video properly. 


Saturday, July 14, 2012

Messy French Roll

Have you ever tried to make a french hair roll? This hairstyle is a little bit hard, and if you get confused, I recommend for you to consult with your hair stylist. But, If you think you have the skills required, here we go! 

Prepare yourself by good brushing your hair before you start. Then, take your hair and make a pony (don't tie it). Start by twisting and warping you hair up. Switch the remaining of your hair to the other side and pin the hair roll (so you could let go the remaining and pull some hair from your french roll). Tease it and style the way you want your french roll to look. To secure everything, pin some hair at the sides. And for the finish - add some strong but flexible hairspray. 

Hunger Games - Katniss Everdeen Inspired Braid Tutorial

Hey guys! I must say, I'm a big Hunger Games fan! Since I started to read the books, actually just finished "Catching fire", I became obsessed. So I decided to post a tutorial for the braid that Katniss wore in the Arena. This braid is most known as a dutch braid, the only difference is that it's curved. 


Step 1: Take three sections of your hair. 

Step 2: Take the first strand and pull it under the first strand. 

Step3: Take the third strap and pull it under the first strap.

Step 4: Add hair to the second strap.

Step 5: Once you add hair to the second strap, you're going to pull it under the third strap.

Step 6: Add hair to the first strap. Add hair into the straps you're holding between your fingers. Then bring that under the braid. 

Step 7: Keep adding hair to each strap, like you would do for a french braid. Pull the straps under the braid and over. You are basically reversing a french braid. 

Continue like that and you're finished! This braid is truly amazing!

Powered by Blogger.
back to top